Showing posts with label Blogger Tutorial. Show all posts

How to Notify FeedBurner Unconfirmed Subscribers to Get Verified?

Thursday, December 9, 2010

As you all know, Feedburner has become a great tool for any bloggers, webmasters or generally website owners. Many of your traffic come from feed readers and if your websites do not have feed account available, it can be a big loss. You can even making money with your feed via Google Adsense too.


Among thousands of your feed subscribers, how many of them have been confirmed and how many of them have been unconfirmed? The unconfirmed subscribers will never receive your blog updates and you will definitely loose a big amount of traffic then.

I have explored many times and finally I got one tool that could help me do this automatically. It is Notify Unconfirmed Subscribers. This tool will allow you sort out your unverified subscribers and a box where you can type your message to send to them by a click.

All of those unverified subscribers will get your message and they will proceed to get their emails verified if they are still using those emails. Otherwise, you should remove those spam emails from your feedburner account.

I have tested this plugin and it worked perfectly and the percentage of my unverifiedsubscribers went down from 30% to less that 3%. That is good and I guess the remaining 3% is either spammers or no longer used emails.

You can download this plugin to use on your own and remember that your hosting must have email feature enabled to use this tool. I think all paid hosting providers support mail feature otherwise, you should do it manually which is not feasible.

Good luck and enjoy. Remember that feed subscribers are traffic and money too.

Source: azblogtips.com
Read more »

Facebook Like Box For Blogger

Thursday, December 2, 2010

Facebook Like Button allows you to provide more Sharing Options to your Readers. Your readers can share your posts on Facebook using the Like Button. Have you added the Like button and still not getting any “Likes”? :(. Ok then we will present the Like button in a much better and elegant way.
Here is a Screenshot of the Facebook Like Box. Isn’t it lovely and more “Likable” than the default Like Button?
image
The  Facebook Like box also includes a link to  your Facebook Fan Page. This FB Like Box was Designed Styled and coded by Mia of Dezign Matterz .  Thanks to her for designing and styling  this awesome Like Box.

How to install the Facebook Like Box?

1. First Fill in the following Details (Code will be updated with these details)
Width of the Like Box                      (Enter the appropriate width of the FB like box)
Facebook Fan Page / Profile URL 
2. Now Login to your Blogger Account and navigate to Design > Edit HTML and check the option which says “Expand Widget Templates”
3. Look for  ]]></b:skin> in your template and just above that place the following code (You can use Ctrl +F to find the code).
.fb_like_box {
margin-top:10px;
-moz-border-radius:10px 10px 10px 10px;
border-radius:10px;
background-color:#3B5999;
border:3px solid #2B2B2B;
margin-bottom:10px;
padding:10px 7px;
width:540px;
}
.fb_like_top {
overflow:visible;
padding:0;margin:0 0 5px;
width:349px;
height:24px;
background:url("https://blogger.googleusercontent.com/img/b/R29vZ2xl/AVvXsEg_YGACUrCoICJbxRx_LlPVRMPrvbYTOI3RWLvWakeae3M-bpjTz5e_INzOc-LQl5X8vgpo85UJctakIl1oTa0UrHGnCMRYs9_iB8mkEfwVZMRvWVl6CJOVRkm0reLckjDH8-jEYnMOQwU/") no-repeat scroll left top transparent;
}
.fb_like_button_holder {
-moz-border-radius:10px 10px 10px 10px;
border-radius:10px;
background:none repeat scroll 0 0 #FFFFFF;
padding:12px 12px 0 12px;
width:515px;
height:42px;
}
4. Now Look for <data:post.body/> in your template and just below that add the following code.
<b:if cond='data:blog.pageType == &quot;item&quot;'>
<div class='fb_like_box'>
<div class='fb_like_top'></div>
<div class='fb_like_button_holder'>
<iframe allowTransparency='true' expr:src='&quot;http://www.facebook.com/plugins/like.php?href=&quot; + data:post.url + &quot;&amp;layout=standard&amp;show_faces=false&amp;width=100&amp;action=like&amp;font=arial&amp;colorscheme=light&quot;' frameborder='0' scrolling='no' style='border:none; overflow:hidden; width:450px;height:30px;'/>
</div>
</div>
</b:if>
5. Now Save your template and you will see a Facebook Like Box on your post pages.

Source: www.bloggerplugins.org
Read more »

Replace Page List Menu Gadget with a Link List

Tuesday, November 30, 2010

The Default Blogger Templates(which can be customized using the Designer) are all made to use the “Blog Pages” as your Blog’s Top Navigation Menu. This is done using a Page List Gadget. But , you might want to setup your own menu with Custom Links. In that  case, you can replace the Page List Gadget with a  Link List. This tutorial guides you on how you can replace the Page List with a Link List without loosing the Menu Styling(and the highlighted active links)..

How do i add non-page links to my Menu

This is a frequently asked question on the Blogger Help Forum. The solution is simple, if you want to display anything other than page links on your Menu, then you will have to use a Link List Gadget instead of using a Page List. If you are using one of the DefaultBlogger Templates, and if you have added a Page List Gadget below the header, you will be using "Page" links as the Navigation Menu. To change this to a Link list, follow these simple steps.
1. Login to your Blogger Account and navigate to the Design Edit HTML tab. Do NOTcheck the “Expand Widget Templates” Option.
2. Now look for(Ctrl + F)
<b:widget id='PageList
and you will find some line  like
<b:widget id='PageList1' locked='false' title='Pages' type='PageList'/>
3. Replace this line by the following Code
<b:widget id='LinkList123' locked='false' title='Menu' type='LinkList'>
<b:includable id='main'>
<div class='widget-content'>
   <ul>
     <b:if cond='data:blog.url == data:blog.homepageUrl'>
     <li class='selected'>
     <a expr:href='data:blog.homepageUrl'>Home</a>
     </li>
     <b:else/>
     <li><a expr:href='data:blog.homepageUrl'>Home</a></li>
     </b:if>
     <b:loop values='data:links' var='link'>
       <b:if cond='data:blog.url == data:link.target'>
       <li class='selected'>
       <a expr:href='data:link.target'><data:link.name/></a>
       </li>
       <b:else/>
       <li><a expr:href='data:link.target'><data:link.name/></a>
       </li>
       </b:if>
     </b:loop>
   </ul>
   <b:include name='quickedit'/>
</div>
</b:includable>
</b:widget>
4. Save the Template.
5. Now you can manually add links to the Menu by using the Quick Edit Wrench Button .

The Styling of the Gadget will be preserved and the Active links will be highlighted.
Read more »

Sticky Post In blogger/blogspot

Sunday, November 21, 2010

What is sticky post ?
A sticky post means make any post remain at top of the page. :)


In wordpress blogging platform, you can do it on their dashboard. But in blogspot you can't, because blogspot has no option like sticky post.

So we have to play with date.

Create a post that you want to make remain on the top, and publish it. Then immediately edit the post. Now while editing, you need not have to edit anything in the content zone, but you have to change the date of publishing - to any future date.

this date format : mm/dd/yr
Read more »

Give me a Reason to Start a Blog !

Saturday, October 23, 2010

Top Ten Reasons to Start a Blog immediately !

Why Should We Blog?


Actually Blogging is becoming more and more popular everyday. Should you join the blogosphere? Take a look at this list to help you make your decision about blogging.

1. To Express Your Thoughts and Opinions

You have something to say, and blogs provide a place to say it and be heard.

2. To Market or Promote Something

Blogging is a great way to help market or promote yourself or your business, product or service.

3. To Help People

Many blogs are written to help people who may be going through similar situations that the blogger has experienced. Many parenting and health-related blogs are written for this purpose.

4. To Establish Yourself as an Expert

Blogs are wonderful tools to help bloggers establish themselves as experts in a field or topic. For example, if you're trying to get a job in a specific field or hoping to publish a book on a specific topic, blogging can help legitimize your expertise and expand your online presence and platform.

5. To Connect with People Like You

Blogging brings like-minded people together. Starting a blog can help you find those people and share your opinions and thoughts.

6. To Make a Difference

Many blogs are issue-based meaning the blogger is trying to provide information to sway people's thinking in a certain direction. Many political blogs and social issues blogs are written by bloggers who are trying to make a difference in their own ways.

7. To Stay Active or Knowledgeable in a Field or Topic

Since successful blogging is partially dependent on posting frequency and providing updated, fresh information, it's a perfect way to help a blogger stay abreast of the events in a specific field or topic.

8. To Stay Connected with Friends and Family

The world has shrunk since the Internet has become more accessible. Blogs provide a simple way for family and friends to stay connected from different parts of the world by sharing stories, photos, videos and more.

9. To Make Money

It's important to point out that most bloggers don't make a lot of money blogging, but the potential does exist to generate revenue from your blog with hard work and commitment. There are many bloggers who bring in big bucks. With patience and practice, you can make money through advertising and other income-generating activities on your blog.

10. To Have Fun and Be Creative

Many people start a blog simply for fun. Perhaps a blogger is a fan of a particular actor or loves knitting and wants to share that passion through a blog. One of the most important keys to successful blogging is having a passion about your blog's topic, so you can write prolifically about it. Some of the best and most interesting blogs started out as blogs that were written just for fun and to give the blogger a creative outlet.


Source: blogger-dashboard.blogspot.com
Read more »

What's the Difference between Wordpress.com vs. Wordpress.org ?


What is Wordpress?

Wordpress is a free software product that is quickly becoming the most popular blogging software on the Internet.

Wordpress.org vs. Wordpress.com:

Wordpress is available in two forms. Wordpress.com is an Open Source software meaning it's free for anyone to use and modify to meet their personal needs (in this case, to create blogs). Since it's free, it does have limitations. Alternatively, Wordpress.org provides the software to create your blog, but Wordpress.org does not host your blog on the Internet for you. You will have to pay a separate hosting provider to obtain a domain name and host your blog online. Using Wordpress.org with a paid hosting service provides maximum flexibility and customization.

Factors to Consider When Choosing Between Wordpress.org and Wordpress.com:

Following are some factors you may want to consider before you decide to start your blog on a paid host with Wordpress.org or Wordpress.com (free):
  • Monetization and Advertisements: Wordpress.com does not allow you to include advertisements of any kind.
  • Customization: Wordpress.com provides a limited amount of space and customization options (although enough for most beginner bloggers).
  • Knowledge: Wordpress.org requires more technical knowledge than Wordpress.com.
  • Future Requirements: If your blog becomes popular, switching to Wordpress.org requires moving your blog and obtaining a new domain name and URL address.

What Features Does Wordpress Offer Bloggers?:

Wordpress provides a simple interface to allow even the most technically-challenged people to start blogs. The software includes a variety of features including:
  • Custom themes
  • Integrated stats tracker
  • Spam protection
  • Auto-save
  • Spell check
  • Tagging
  • Automatic ping
  • Various sidebar widgets
  • Multiple authors
  • Plug-ins
  • Support
  • Wordpress.org also allows for advertising, a custom domain, custom email addresses and more

Wordpress Tip from Your About.com Web Logs Guide:

If you have trouble deciding between starting your blog on Wordpress.com or Wordpress.org, you may want to consider starting a practice blog on Wordpress.com first. If you've never started your own blog before, playing with features and testing effects on a practice blog is a great idea. Your practice blog could be on any topic you love simply to learn how to blog and learn the Wordpress software. After a few months, when you feel comfortable with the software, it should be easier to decide if you want to stick with Wordpress.com or switch to Wordpress.org for your 'real' blog.

Wordpress.com vs. Wordpress.org: Consider Your Blogging Goals:

Choosing between starting a free blog at Wordpress.com or paying for hosting so you can start a blog at Wordpress.org is a decision that should be based on your long term goals for your blog.


Source: blogger-dashboard.blogspot.com
Read more »

How do I enable comments on Blogger BlogSpot ?

Monday, October 18, 2010

To enable Comments, go to the Settings | Comments tab:

Screenshot: Settings | Comments
Then select the Show radio button and click Save Settings:
Screenshot: Show Comments
Once Comments are enabled, several more settings appear:
Who Can Comment?
  • Only Registered Users: if not logged in already, visitors will be prompted to log into Blogger before leaving a comment. If they don't have an account, they can create one.
  • Anyone: anybody in the whole wide world can leave comments
  • Only Members of this Blog: only members of the blog (if it's a Team Blog) can leave comments
Default for Posts
  • New Posts Have Comments: by default, all new posts have Comments enabled
  • New Posts Do Not Have Comments: by default, Comments are disabled on new posts, but can be enabled on a by-post basis:
    Screenshot: Comment Post Options
Comments Timestamp Format
  • The date and time that comments are left will be displayed in the format you choose here.
Show Comments in a Popup Window?
  • Yes: Clicking the "comments" link for a post will bring up a popup window displaying the previous comments and a form for creating a new one.
  • No: Clicking the "comments" link will display the previous comments and the commenting form in the current browser window.
Show Profile Images on Comments?
  • Yes: Blogger users with public profile images will have those images displayed next to their comments. (Note: currently, profile images will only display on the posting form, and not on the blog itself.)
  • No: No profile images will be displayed.
Comment Notification Address
  • New comments will be emailed to the address you list here.
Click Save Settings then republish your blog.
Notes:
  • Blogger Comments require the use of certain template tags; If you have a template without these tags, Blogger attempts to automatically inject them into your template when you enable Comments, but there's a chance it won't work perfectly. You can check on this by comparing the default template tag code with the injected code in your template (it should be near the post byline).
  • All of blogger default templates already have the correct template tags for comments.
  • Comments will always be displayed chronologically.
  • The "Post a Comment" form is hosted at blogger.com, even for externally-publishing blogs.
  • Comments aren't enabled for older posts (prior to when you turned on comments), and unfortunately there isn't an automated way to do this.


Source: blogger-dashboard.blogspot.com
Read more »

Which Blogging Software do I need to choose ?

Saturday, October 16, 2010


Questions Bloggers need to know before Choosing a Blogging Software!

Before You Choose Your Blogging Software, Ask Yourself These Six Questions

Choosing a blogging software can be confusing because on the surface, the various blogging software products such as Wordpress, Blogger, TypePad, Moveable Type, LiveJournal and more are quite similar. Following are six questions to ask yourself before you select your blogging software to help you make the best choice to be a successful blogger.

1. What Are Your Goals for Your Blog?

Do you want to blog for fun or are you trying to make money or build a popular, highly-trafficked blog? The blogging software you choose is largely dependent upon your goals for your blog. Ask yourself the following questions to determine your goals for your blog:
  • How much space will you need to store your blog's images and content?
  • Do you want to display ads on your blog?
  • Do you want to add forums and other features to your blog?

2. Do You Need to Significantly Customize Your Blog's Design?

Blogging software varies in terms of its ability to allow bloggers to customize the appearance and layout of their blogs with logos, specific fonts, designs and more. It's important that you determine the amount of customization you want and need for your blog before you select your blogging software.

3. Are You or Is Someone You Know Technical?

Different blogging software platforms require varying amounts of technical skill and knowledge. While there are blogging software options that even the most technically-challenged people can navigate and use successfully, many of the blogging software packages that provide advanced customization and features require at least some technical ability.

4. Will Your Blog Have Multiple Authors?

Some blogging software platforms are easier to configure with multiple authors than others. Determine your author needs before you choose your blogging software.

5. Do You Need Custom Email Addresses Tied to Your Blog's Domain Name?

If you want to have email addresses customized to match your blog's domain name than your blogging software options are more limited. Even if this is something you may not need in the short term, it's important to think about it now before you choose your blogging software.

6. Do You Have Money to Spend Each Month on Blogging Software and a Blog Host?

Your budget will have a significant impact on the blogging software you choose. While there are many free blogging software platforms available online, those free blogging programs typically offer limited features. Although those limited features are usually adequate for the average blogger, they may not be enough for your blog depending on your long term goals for it.

Note :If you ask me on my opinion about which blog is to go for ! i could tell you my favorite is blogger !

Read more »

How to Setup blogger feed settings ?

Wednesday, October 13, 2010

How do I change my site feed settings IN BLOGGER ?

To enable or disable the site feed(s) for your blog, first go to the Settings | Site Feed tab.

Here, you'll have one simple option, where you can select how much of your content you want to syndicate. "Full" will put the entire content of each post in your site feed, while "Short" only includes an excerpt from the beginning of each post. The "None" option turns your site feed off entirely.
Basic site feed settings
That one site feed may be enough for you, but if you want some more options, click on the "Advanced Mode" link.
Advanced site feed settings
In Advanced Mode you have options for three different types of feeds. The first is for your blog posts, and is the same as the single option in Basic Mode. After that comes the comment feed. This one will contain all comments made on all posts on your blog. Finally, there is the per-post comment feed. With this option, each individual post will have its own site feed, containing only its own comments. Each option has the same "Full," "Short," and "None" setting choices.
Notes:
  • Once you've enabled your site feeds, you may want to provide a way for your readers to find them. If the template you're using isn't displaying links to these files, you can add them in using the site feed template tags.
  • All site feeds are published in Atom 1.0 format. However, if you add ?alt=rss to the end of any site feed URL, you can get the same feed in RSS 2.0 format.


Source: blogger-dashboard.blogspot.com
Read more »

Adding Google Analytics to Blogger BlogSpot with very easy steps !

Monday, October 11, 2010

How to Add Google Analytics to Your Blogger !

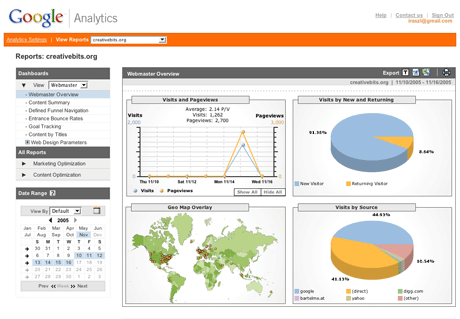
Google Analytics is free service that lets you track the performance of your websites and blogs from one simple, easy-to-use interface.

1-Grab Your Google Analytics Code Block

-Login to Google Analytics at http://google.com/analytics/. The main Settings page loads.
-Click on Add Website Profile. A form displays.
-Select Add a Profile for a New Domain.
-Enter the URL of your site or blog.
-Select your country and time zone. Click Finish.
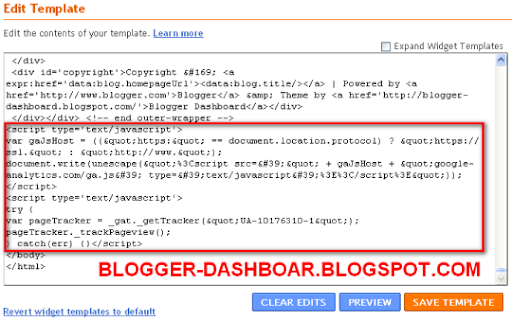
-Analytics provides you with a code block - a swatch of HTML - to add to your site's pages.
-Highlight the code block and then copy it by selecting Edit > Copy or Ctrl-C or Command-C.

2-Add the Google Analytics Code Block to Your Blogger Blog

-Login to http://www.blogger.com/. The Dashboard loads.
-Under the blog you want to add Analytics tracking to, click on Layout or Template.
-Click on Edit HTML. An editing screen for your blog template's HTML displays. Just scroll to the bottom.
-Look for the end of the template. It'll look like:
</div> </div>
<!-- end outer-wrapper -->
(Google Analytics Code Block is going to go here!!!)
</body>
</html>
Put your cursor right before that </body> tag.
Paste the Google Analytics Code Block by selecting Edit > Paste, Ctrl -V or Command-V.
Click Save Changes.
You have now added the Google Analytics Code Block to Your Blogger Blog.

Check Your Work
To ensure that you have successfully added the Google Analytics Code Block to your Blogger blog, go back to http://google.com/analytics/.
Next to your blog's URL it will say either Receiving Data (you were successful) or Tracking Not Installed (something is amiss).
If it said Tracking Not Installed, click on Check Status. Google then checks your blog for the Analytics Code Block and reports back if it find it or not.
If not, try re-pasting the Code Block in.


Source: blogger-dashboard.blogspot.com
Read more »

What are backlinks and how do I use them in blogger?

Thursday, October 7, 2010

Backlinks and trackbacks are the same for blogger !

Backlinks enable you to keep track of other pages on the web that link to your posts. For instance, suppose Alice writes a blog entry that Bob finds interesting. Bob then goes to his own blog and writes a post of his own about it, linking back to Alice's original post. Now Alice's post will automatically show that Bob has linked to it, and it will provide a short snippet of his text and a link to his post. What it all works out to is a way of expanding the comment feature such that related discussions on other sites can be included along with the regular comments on a post.
The backlinks setting can be found under the Settings | Comments tab, and consists of a single, simple option to turn it on or off:
blogger  default templates are already set up with the necessary code for backlinks. However, if you have a custom template, or one of our templates from before this feature was launched, you will need to add the code yourself. Instructions for that are here.
Once everything is set up, you'll see a new link marked "Links to this post" next to the comment link for each post:

If you click that link you'll be taken to the post page, where the backlinks are all listed beneath the comments. Clicking the triangles next to each link will display a snippet of text from the page linking to you, as well as some author and date information.

If you want to turn off backlinks for individual posts, you can do so. The process is the same as that for turning off comments. Just edit the post in question and change the options that appear below the posting form:

Notes:
  • For the curious, this feature is based on the link: operator of Blog Search. So sites linking to your blog will need to be indexed by Blog Search and there may be a slight delay before the backlinks appear on your blog.
  • The comment notification email setting does not apply to backlinks, so you will not be notified of new links when they appear. This is because these links are looked up on-the-fly each time you view an individual post.
  • In lieu of comment notification, you can use Blog Search with a query such as link:your-blog-here.blogspot.com, and then subscribe to the results. That will have a similar effect.

Notice : you may want to Increase Your Blog's Technorati Backlinks very effectively !

Than you need to check this post ! here you go for free :)


Source: blogger-dashboard.blogspot.com
Read more »

Why word verification appearing on my posting form in blogger ?

Friday, October 1, 2010

Why do I have word verification on my posting form?

Word verification on the posting form is meant to be a spam reduction mechanism for BlogSpot in general. There are two potential causes:

Potential Spam

In this case, word verification is applied to certain potential spam blogs by an automated system. Because this is automated there will necessarily be some false positives, though we're continually working on improving our algorithms to avoid these. If your blog is one of the false positives, we apologize. Having the word verification on your posting form does not prevent you from publishing and does not mean that your blog will be deleted or otherwise punished if it is not actually in violation of our policies.
To avoid further inconveniences when publishing, click the "?" (question mark) icon next to the word verification on your posting form:

That will take you to a page where you can request a review for your blog. We'll have someone look at it, verify that it isn't spam, and then whitelist your blog so it no longer has the word verification requirement.

High Posting Rate

If you make a large number of posts in a single day, you will be required to complete a word verification for each one, independent of whether your blog has been cleared as a potential spam or not. If this happens to you, simply complete the word verification for each post, or wait 24 hours, at which point it will be removed automatically.
This restriction is in place as much to control the load on our servers as to prevent explicit spam. Therefore, there is not a whitelisting review process to exempt individual blogs.
Notes:
  • In cases where word verification is required, all posts made via email will be saved as drafts, rather than published.
  • This is unrelated to the word verification setting for comments.
  • If your word verification is continually reported as incorrect, even though you are entering the correct letters, please try logging out, clearing your browser's cache and Blogger.com cookies, then logging in again to post. Remember to copy and paste your post to a text file first, to keep it safe.


Source: blogger-dashboard.blogspot.com
Read more »

How to setup an FTP (or sFTP) connection to my external web host?

FTP (or sFTP) Setup connection to your own external web host !

Go to Settings | Publishing:
 Settings | Publishing
and select a connection method:
Connection Settings
Then, enter your settings:
FTP Server setting

FTP Blog URL

FTP Path

FTP filename

When you're done, save your server details via the Save Settings button at the bottom, and republish your blog.
Notes:
  • The default port numbers will be used (:21 for FTP and :22 for SFTP). Specifying an alternate port will not work.
  • Do not include http:// or ftp:// in the server address or the path setting.


Source: blogger-dashboard.blogspot.com
Read more »

How do I make a draft post in BLOGGER ?

To make a draft post in BLOGGER !

A draft is a post that is in progress. It will not be shown on your blog and will only be accessible from your dashboard.
To mark a post as draft, simply click the "Save as Draft" button below the post-entry field:
Save as Draft
To edit a draft post, locate it in the Posting | Edit Posts tab and click on its "Edit" link.
Locate a Draft Post
There are visual indicators that posts are drafts: They have no "View" links like published posts do, and they include the word "draft" to the right of their titles.
Drafts can be published, and published posts can be converted into drafts, simply by clicking the appropriate "Publish" or "Draft" button when editing the post.


Source: blogger-dashboard.blogspot.com
Read more »

Adding comment form beneath your blog posts in blogger

Saturday, September 18, 2010


How to Add Comment Form Beneath Your Posts

Blogger have developed an inline (embedded) comment form which can be enabled through Blogger in Draft. This is probably the most requested feature for Blogger


1- Log in to Blogger | Dashboard | Settings | Comments.
2- For the third option Comment Form Placement, chose Embedded below post and then click SAVE SETTINGS button to save your changes.
3- Now, go to Layout | Edit HTML.
4- Check Expand Widget Templates and your page will automatically refresh.
5- Find:
<b:include data='post' name='comments' />
6- Place the following code right after the above code:
<b:include data='post' name='comment-form'/>
7- Now, your code should look something like this:
<b:include data='post' name='comments' />
<b:include data='post' name='comment-form'/>

8- Save your template and you're done.

Read more »

How to hide labels from blogger post footer

Thursday, September 16, 2010


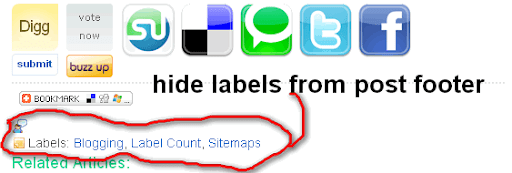
Hide labels from blogger post footer ! just very easy as you want :)
many people want or prefer to hide labels or tags from the post footer ,therefore we are going to the following steps !
Here is how to do it.
Click 'Layout' tab and click the 'Edit HTML' Subtab. Now click 'Expand Widget Templates' to expand the CSS code. Find the following code in your template.

<b:if cond='data:post.labels'>
          <data:postLabelsLabel/>
          <b:loop values='data:post.labels' var='label'>
            <a expr:href='data:label.url' rel='tag'><data:label.name/></a><b:if cond='data:label.isLast != &quot;true&quot;'>,</b:if>
          </b:loop>
        </b:if>
First take a backup of your template and after that delete this portion from your template. Now no labels will come beneath your posts. I hope this will help you.
If you are facing any problems regarding this small hack just “nock nock” … comment bellow the post and i will be happy to answer you :)

Read more »

Adding Three columns for Blogger footer section !

Wednesday, September 15, 2010

How to add three columns to blogger footer section ?


Actually Adding extra columns to your footer section will provide more valuable space for blog widgets, and also contribute a modern "Web 2.0" appeal for your blog design.
There are only four main steps to this tutorial, and all the overall process is quite simple. this footer hack is specially for blogs that have different  widths and styles, and so bloggerbuster has designed a fluid solution which should work in any Blogger layouts template.

Creating the footer new columns

Back up your existing blog template! Before making any modifications to your blog template!
To back up your existing template, go to Template>Edit HTML in your Blogger dashboard, and click on the "Download Full Template" link near the top of the page. You can then save your existing XML template file to your computer.

Add extra code to your footer section.

Go to Template>Edit HTML in your Blogger dashboard, and do not check the "expand widget templates" box (this simplifies the process).
Now you need to find this section in your template:

<div id='footer-wrapper'>
<b:section class='footer' id='footer'/>
</div>

all we need to change is the line highlighted in orange .
Replace the entire line highlighted in red with the code below:
<div id='footer-column-container'>

<div id='footer2' style='width: 30%; float: left; margin:0; text-align: left;'>

<b:section class='footer-column' id='col1' preferred='yes' style='float:left;'/>
</div>

<div id='footer3' style='width: 40%; float: left; margin:0; text-align: left;'>
<b:section class='footer-column' id='col2' preferred='yes' style='float:left;'/>
</div>

<div id='footer4' style='width: 30%; float: right; margin:0; text-align: left;'>

<b:section class='footer-column' id='col3' preferred='yes' style='float:right;'/>
</div>

<div style='clear:both;'/>
<p>
<hr align='center' color='#5d5d54' width='90%'/></p>
<div id='footer-bottom' style='text-align: center; padding: 10px; text-transform: lowercase;'>

<b:section class='footer' id='col-bottom' preferred='yes'>
<b:widget id='Text2' locked='false' title='' type='Text'/>
</b:section>

</div>
<div style='clear:both;'/>

</div>


here is a good idea to save your template at this stage


-Adding style for the new footer section


Once again, open the Edit HTML section in your Blogger dashboard. This time, you need to find the closing "</b:skin>" tag, which is where the style section of your template ends.


Immediately before this line, add the following lines of code:


#footer-column-container {

clear:both;


}


.footer-column {

padding: 10px;


}


Now you have finished adding these new sections to your footer, go to the Layout section of your Blogger dashboard (Template>Layout), and you will see the three new column, plus a lower section which spans the width of all three column, to which you can now add new widgets!


Amanda added a horizontal line to the footer section to ensure that there is a clear distinction between content in the footer columns and content in the wider section beneath. If you would like to change the color of this line, you can do so by replacing the hex color values in the line below (highlighted in orange) with a different color:


<hr align='center' color='#5d5d54' width='90%'/>


I thank Amanda for this tutorial enables us to customize the footer section with ease, so we can add more widgets and content to this area of our blog template !

Source: blogger-dashboard.blogspot.com
Read more »

Easy steps to Add Blogger Sitemap to Google Webmaster Tools!

Sunday, September 12, 2010


Google Webmaster Tools help your customers understand site traffic and diagnose potential problems by providing insights into how Google crawls and indexes their site.
Webmaster Submission Guide
Submitting the Sitemaps of your blog to Google Webmaster helps the search engine(Google) to crawl your webpage's easily and more quickly! This post explains the procedure to add your blogger blog's sitemap to the Google Webmaster Tools.


  1. Sign-in to Google Webmaster Dashboard using your Google Account.

  2. Type your blog URL and click Add Site:
    Add Blogger Sitemap to Google Webmaster Tools

  3. Once your site is added to Google Webmaster, you need to verify the site by adding a Meta Tag to your blog:
    Add Blogger Sitemap to Google Webmaster Tools

  4. Copy the Meta Tag code given by Google Webmaster as shown in the screenshot below:
    Add Blogger Sitemap to Google Webmaster Tools

  5. Now go to Blogger Dashboard - Layout - Edit HTML - then search(Ctrl+F) for the code given below in the header section:

    <b:include data="blog" name="all-head-content"/>


  6. Then Paste the Meta Tag just after the above code and Save the Template.

  7. Now click Verify in the Google Webmaster Tools. Your site will be verified if you followed the above steps clearly:
    Add Blogger Sitemap to Google Webmaster Tools

  8. Next step is to add sitemaps of your blog. Select Sitemap from the left sidebar:
    Add Blogger Sitemap to Google Webmaster Tools

  9. You can add the following sitemaps of your blogger blog to the Google Webmaster:

    http://www.YourBlog.com/atom.xml?redirect=false

    http://www.YourBlog.com/feeds/posts/default?=rss

    Add Blogger Sitemap to Google Webmaster Tools
  10. Finished! Your Blog's sitemap will be added to Google now!
If you have any question just leave me a comment and i will answer you ASAP !
Happy Blogging :)

Read more »


Copyright © 2010 Blogger Tips And Tricks | Affiliate Marketing | Make Money Blogging. All Rights Reserved. Using Xclear Theme | Bloggerized by Themescook Developed by Helios | Powered by Blogger