Using Fonts and Colors in blogger !

Sunday, September 26, 2010

In the Layout | Fonts and Colors tab, you can easily edit and customize the fonts and colors of your blog without any knowledge of HTML or CSS. (Note: Certain templates allow you to edit more elements of your blog than others.)

Color Elements

How do I edit the colors in my blog?

First choose the element you would like to change the color of:
Then choose the color you would like that element to be. You can either click on the color you want or enter the color hex code:
Colors
Colors
When you change your blog colors, you can view your changes in the blog preview beneath the color panel. Make sure you save your changes after you have finished selecting the colors for your blog. If you're feeling adventurous you can click "Shuffle blog colors" to randomly shuffle all of the colors already in your blog. If you don't like your changes, you can revert back to your default colors by clicking "Revert to template default."

How do I edit the fonts in my blog?

First choose the element you would like to change the font of:
Font Elements
Then choose the font you would like that element to be by clicking the radio button next to your font of choice. You can also change the font style to bold and/or italic by checking the box next to the style you want and you can make the font size larger or smaller by clicking "larger" or "smaller."
Fonts
When you change your blog's fonts, you can view your changes in the blog preview at the bottom half of the screen. Make sure you save your changes after you have finished selecting the fonts for your blog.
Read more »

Lizzard Blogger Template

Lizzard Blogger Template

download-url button demo-url button

Author: ThemescookAuthor URL: http://www.themescook.comDesigner: daris4Designer URL: http://www.daris4.info
Read more »

Easy Way to add three columns for Blogger footer section

Saturday, September 25, 2010

How to add three columns to blogger footer section ?


Actually Adding extra columns to your footer section will provide more valuable space for blog widgets, and also contribute a modern "Web 2.0" appeal for your blog design.
There are only four main steps to this tutorial, and all the overall process is quite simple. this footer hack is specially for blogs that have different  widths and styles, and so bloggerbuster has designed a fluid solution which should work in any Blogger layouts template.

Creating the footer new columns

Back up your existing blog template! Before making any modifications to your blog template!
To back up your existing template, go to Template>Edit HTML in your Blogger dashboard, and click on the "Download Full Template" link near the top of the page. You can then save your existing XML template file to your computer.

Add extra code to your footer section.

Go to Template>Edit HTML in your Blogger dashboard, and do not check the "expand widget templates" box (this simplifies the process).
Now you need to find this section in your template:

<div id='footer-wrapper'>
<b:section class='footer' id='footer'/>
</div>

all we need to change is the line highlighted in orange .
Replace the entire line highlighted in red with the code below:
<div id='footer-column-container'>

<div id='footer2' style='width: 30%; float: left; margin:0; text-align: left;'>

<b:section class='footer-column' id='col1' preferred='yes' style='float:left;'/>
</div>

<div id='footer3' style='width: 40%; float: left; margin:0; text-align: left;'>
<b:section class='footer-column' id='col2' preferred='yes' style='float:left;'/>
</div>

<div id='footer4' style='width: 30%; float: right; margin:0; text-align: left;'>

<b:section class='footer-column' id='col3' preferred='yes' style='float:right;'/>
</div>

<div style='clear:both;'/>
<p>
<hr align='center' color='#5d5d54' width='90%'/></p>
<div id='footer-bottom' style='text-align: center; padding: 10px; text-transform: lowercase;'>

<b:section class='footer' id='col-bottom' preferred='yes'>
<b:widget id='Text2' locked='false' title='' type='Text'/>
</b:section>

</div>
<div style='clear:both;'/>

</div>


here is a good idea to save your template at this stage


-Adding style for the new footer section


Once again, open the Edit HTML section in your Blogger dashboard. This time, you need to find the closing "</b:skin>" tag, which is where the style section of your template ends.


Immediately before this line, add the following lines of code:


#footer-column-container {

clear:both;


}


.footer-column {

padding: 10px;


}


Now you have finished adding these new sections to your footer, go to the Layout section of your Blogger dashboard (Template>Layout), and you will see the three new column, plus a lower section which spans the width of all three column, to which you can now add new widgets!


Amanda added a horizontal line to the footer section to ensure that there is a clear distinction between content in the footer columns and content in the wider section beneath. If you would like to change the color of this line, you can do so by replacing the hex color values in the line below (highlighted in orange) with a different color:


<hr align='center' color='#5d5d54' width='90%'/>


I thank Amanda for this tutorial enables us to customize the footer section with ease, so we can add more widgets and content to this area of our blog template !
Read more »

Funky Dashboard is My Second Premium Blogger Template


Funky Dashboard is free premium Blogger Template !

FUNKY DASHBOARD is high quality template  colorful theme and playful .
it has automatic read more widget ! which is no need to add the read more in each post like the other hacks !
its has professional  slideshow widget ! which you can use it with text and image at the same time !

Demo | Download
 
INTRUCTION FOR THE TEMPLATE WILL BE ASAP :) ENJOY IT GUMGUM !


Source: blogger-dashboard.blogspot.com
Read more »

Beautiful Social Bookmarking Box For your blog

Friday, September 24, 2010


Create fancy share box with CSS and jQuery

This tutorial will show you how to turn unordered list (UL) into an fancy social bookmarking sharing box. You will see how to style such box, how to add interactivity!
how to create jQuery plugin that will turn any UL into sharing box.
The idea is to have all of the buttons shown inline and partially hidden. When user hovers over a button it slides to the right and become visible.
go Check it from the author .
Check here another sexy bookmarking widget for blogger !

Super Sexy Bookmarks Widget for Blogger 


Source: blogger-dashboard.blogspot.com
Read more »

Zin Folio

Thursday, September 23, 2010

zin folio blogger template

download-url button demo-url button

Designer: Web2feelDesigner URL: http://web2feel.com/Coder: Cahaya BiruCoder URL: http://www.cahayabiru.com/Instructions: http://www.cahayabiru.com/2009/08/zin-folio.html
Read more »

Mainan

Mainan Blogger Template

download-url button demo-url button

Designer: PaddsolutionDesigner URL: http://www.paddsolutions.com/Coder: Blogger Template PlaceCoder URL: http://www.bloggertemplateplace.com/
Read more »

Xclear Blogger Template

Monday, September 20, 2010

Xclear Blogger Template

download-url button demo-url button

Author: ThemescookAuthor URL: http://www.themescook.comDesigner: daris4Designer URL: http://www.daris4.info
Read more »

GoDaddy Is Up For Sale That Could Fetch Over $1 Billion!

Sunday, September 19, 2010

Oh, my God! I could only say this when I read this news on The Wall Street Journal this afternoon. I wish this could be a fooling of April 4 but it was not. The update was also spread around on the internet from WebmasterWorld to the San Francisco Chronicle.
According to The Wall Street Journal report, GoDaddy posted revenue between $750 million and $800 million in 2009. With this reported news, the auction could fetch up over $1 billion in sale. This could be possible but who would be the next owner after Bob Parson is still a big question.


In 2003 Go Daddy’s revenue was $39.3 million, 2004 was $73 million, 2005 was $139.8 million, 2006 was $240.9 million, 2007 was $349.6 million and 2008 revenue topped $497.9 million. (SecondShares)
Here are some further information from WSJ for your reference:
GoDaddy.com, the closely held website that registers Internet domain names, has put itself up for sale in an auction that could fetch more than $1 billion, people familiar with the matter said.
Qatalyst Partners, the boutique firm run by veteran technology banker Frank Quattrone, has been hired to shop the Go Daddy Group Inc., which runs the world’s largest domain name registrar, these people said. Private-equity firms are expected to bid for the company, which currently has more than 43 million domains under management.
It seems that GoDaddy would follow Register.com, web.com and Network Solutions and get itself owned by a private-equity’s firm.
I myself do not know whether GoDaddy could get itself acquired by new new company or not but it is a big loss for many bloggers including ABlogTips. GoDaddy is still the leading domain registrar and I have been with it for more than 7 years now.
Just a small update and I think many of you who have been with GoDaddy for a while would like to be aware of this too.
Read more »

Sikhi Doller

shikki doller blogger template

download-url button demo-url button

Author: Vk BhardwajAuthor URL: vikasavinasbhardwaj@gmail.com

Sikhi Doller Blogger Template is a 3 column + stylish Background blogger template.Template has been designed on very simple but high quality design and is for users who like using white and clean blogger templates.The design is very neat and clean.Seo for title has also been done,just download it and enjoy using this template.
Read more »

What is the Navbar ? - Blogger Help


What is the Navbar?

Print
Blogger Navbar
The Blogger Navbar appears by default at the top of every Blogger-powered blog. Navbar features include:
  • [B]: takes you back to www.blogger.com.
  • Search Blog: searches the blog you're viewing. Results will appear directly on the page.
  • Flag Blog: lets you mark the current blog as objectionable.
  • NextBlog: takes you to a random, recently-updated Blogger blog.
  • [email address]: If you are logged in to your account, you'll see your own address here. Other viewers will see their own email addresses, or none at all if they aren't logged in.
  • Dashboard: If you are logged in, you'll have a link to your own dashboard.
  • Sign In/Out: This displays the appropriate option, depending on whether you're logged in or not.
The Navbar appears on all freely-hosted Blog*Spot blogs, but can be disabled for users publishing via FTP. It is available in several colors, and is configured in the Template tab in Blogger's interface. If you are using a classic template, you'll see a menu from which you can select a color. For blogs using Layouts, just click the "edit" link on the Navbar page element.
Notes:
  • Unless you publish your blog via FTP, the Navbar cannot be disabled.
  • Blogger has made every effort to make sure the Navbar doesn't interfere with custom template designs. However, some display problems may occur. Here are a few things to try if you are running into trouble:
    • add style="margin-top:40px;" to the topmost element of your Template. (i.e. <table> would become <table style="margin-top:40px;">)
    • make sure the closing </head> tag is present; it should go before the <body> tag.
If you want to hide blogger navbar ? than you need to check the following post about that !


Source: blogger-dashboard.blogspot.com
Read more »

Fixed :xml Error parsing when verification webmaster code into blogger


Many people has the following xml error :
Your template could not be parsed as it is not well-formed. Please make sure all XML elements are closed properly.
XML error message: The element type "meta" must be terminated by the matching end-tag "".
 
Specially when they are trying to put the verification webmaster code for sitemap into their xml templates ! many people get the same error ,but don’t worry ad be happy ,here is the solution gumgum :)
 
The Solution is very simple ! just you need to go to this website and parse the provided code from Google webmaster for verification !
 
copy the result and go to your template ! paste the code again and your done . if u need more help drop a comment below i will be glad to answer you ASAP!
HAPPY BLOGGING GUMGUM :)

Source: blogger-dashboard.blogspot.com
Read more »

What is Twitter ,how to use it and what for ?

WHAT IS TWITTER ?

Twitter is a service for friends, family, and co–workers to communicate and stay connected through the exchange of quick, frequent answers to one simple question: What are you doing?
WHY USE TWITTER ?

Why? Because even basic updates are meaningful to family members, friends, or colleagues—especially when they’re timely.
  • Eating soup? Research shows that moms want to know.
  • Running late to a meeting? Your co–workers might find that useful.
  • Partying? Your friends may want to join you.

Twitter is Social Messaging

While Twitter may have started as a micro-blogging service, it is grown into much more than simply a tool to type in quick status updates. I often describe Twitter as a cross between blogging and instant messaging, but even that doesn't do it justice.
Twitter is social messaging. With the ability to follow people and have followers, and the ability to have interact with Twitter on your cell phone, Twitter has become the perfect social messaging tool. Whether you are out on the town and want to coordinate with a group of people as to what hot spot to hit next, or keeping people informed of developments at a company-sponsored event, Twitter is a great tool for quickly communicating a message to a group of people.

Twitter is News Reporting

Turn on CNN, Fox News or any other news-reporting service and you'll likely see a news ticker streaming across the bottom of the television set. In a digital world that is relying on the Internet more and more for news, that streaming ticker is Twitter.
Outdoor festivals like the South-by-Southwest festival in Austin, TX and major events like the E3 conference have shown what a great resource Twitter can be for quickly reporting news to a huge group of people. Faster and more immediate than a blog, Twitter has been embraced by the "new media" of the blogosphere and has slowly won acceptance among traditional media outlets.

Twitter is Social Media Marketing

Twitter has become a favorite target for social media marketing. This new form of getting the message out has been used effectively by Barak Obama during his Presidential campaign, and is used by everyone from magazines to movie stars as a quick way to connect with an audience.
With utilities like Twitter feed, it is easy to convert an RSS feed into Twitter updates. This makes it easy to use Twitter as a form of social media marketing.

What is Twitter?

This brings us back to the original question. What is Twitter? It is many different things to many different people. It can be used by a family to keep in touch, or a company to coordinate business, or the media to keep people informed or a writer to build up a fan base.
Twitter is micro-blogging. It is social messaging. It is an event coordinator, a business tool, a news reporting service and a marketing utility.
There. That wasn't so hard, was it? go get it GumGum :) register for free here (twitter free registration)

Read more »

Adding comment form beneath your blog posts in blogger

Saturday, September 18, 2010


How to Add Comment Form Beneath Your Posts

Blogger have developed an inline (embedded) comment form which can be enabled through Blogger in Draft. This is probably the most requested feature for Blogger


1- Log in to Blogger | Dashboard | Settings | Comments.
2- For the third option Comment Form Placement, chose Embedded below post and then click SAVE SETTINGS button to save your changes.
3- Now, go to Layout | Edit HTML.
4- Check Expand Widget Templates and your page will automatically refresh.
5- Find:
<b:include data='post' name='comments' />
6- Place the following code right after the above code:
<b:include data='post' name='comment-form'/>
7- Now, your code should look something like this:
<b:include data='post' name='comments' />
<b:include data='post' name='comment-form'/>

8- Save your template and you're done.

Read more »

Very Simple Blogger Tag Cloud Widget for your Blog

Friday, September 17, 2010


Searching for tag cloud widget for your blog ? well they are so many up there on the net ! but since many people want and search for easy way ! so here is the easy GUM GUM :)
Actually this hack brought to you by Raymond which was the most simple blogger tag cloud i ever found until now !
How to apply:
============

Installation:

If you already have a Labels page element installed, skip to step 2.

Step 1: Install the Labels page element by browsing to your template settings:


Click "Add a Page Element" in the column you wish:


Then find the Labels page element and click "Add to Blog":


Step 2: Replace the Labels page element widget code with the custom tag cloud code above.

First navigate to your templates source under your template settings:


Then check off "Expand Widget Templates":


Search for the Label page element you are replacing by searching for widget code. It will look something like this
<b:widget id='Label1' locked='false' title='Tags' type='Label'>
but id and title maybe different, so use your browser's search tool and look for type='Label'.

Delete the Label widget code from the start to the end marked by
</b:widget>
and replace with the custom Tag Cloud code from above.
<b:widget id='Label1' locked='false' title='Tags' type='Label'>
<b:includable id='main'>
<b:if cond='data:title'>
<h2><data:title/></h2>
</b:if>
<div class='widget-content' style='text-align: justify;'>
<script type='text/javascript'>
/*
Simple Blogger Tag Cloud Widget
by Raymond May Jr.
http://www.compender.com
Released to the Public Domain
*/

//Settings / Variables
var max = 150; //max css size (in percent)
var min = 70; //min css size (in percent)
var showCount = false;  // show counts? true for yes, false for no
var minCount = 1;  // what is the minimum count for a tag to be shown? 1 for all


//Begin code:
var range = max - min;

//Build label Array
var labels = new Array();
<b:loop values='data:labels' var='label'>
labels.push(&quot;<data:label.name/>&quot;);
</b:loop>

//URLs
var urls = new Array();
<b:loop values='data:labels' var='label'>
urls.push(&quot;<data:label.url/>&quot;);
</b:loop>

//Counts
var counts = new Array();
<b:loop values='data:labels' var='label'>
counts.push(&quot;<data:label.count/>&quot;);
</b:loop>

//Number sort funtion (high to low)
function sortNumber(a, b)
{
return b - a;
}

//Make an independant copy of counts for sorting
var sorted = counts.slice();

//Find the largest tag count
var most = sorted.sort(sortNumber)[0];

//Begin HTML output
for (x in labels)
{
if(x != &quot;peek&quot; &amp;&amp; x != &quot;forEach&quot; &amp;&amp; counts[x] >= minCount)
{
//Calculate textSize
var textSize = min + Math.floor((counts[x]/most) * range);
//Show counts?
if(showCount)
{
var count = &quot;(&quot; + counts[x] + &quot;)&quot;;
}else{
var count = &quot;&quot;;
}
//Output
document.write(&quot;<span style='font-size:&quot; + textSize + &quot;%'><a href='&quot; + urls[x] + &quot;' style='text-decoration:none;'>&quot; + labels[x] + count + &quot;</a></span> &quot; );
}
}
</script>
</div>
</b:includable>
</b:widget>


Happy Blogging … GUM GUM :)


Read more »

How to hide labels from blogger post footer

Thursday, September 16, 2010


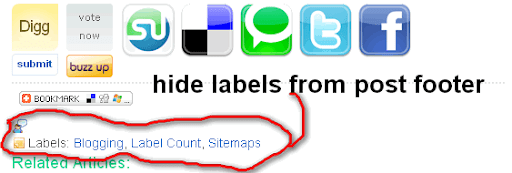
Hide labels from blogger post footer ! just very easy as you want :)
many people want or prefer to hide labels or tags from the post footer ,therefore we are going to the following steps !
Here is how to do it.
Click 'Layout' tab and click the 'Edit HTML' Subtab. Now click 'Expand Widget Templates' to expand the CSS code. Find the following code in your template.

<b:if cond='data:post.labels'>
          <data:postLabelsLabel/>
          <b:loop values='data:post.labels' var='label'>
            <a expr:href='data:label.url' rel='tag'><data:label.name/></a><b:if cond='data:label.isLast != &quot;true&quot;'>,</b:if>
          </b:loop>
        </b:if>
First take a backup of your template and after that delete this portion from your template. Now no labels will come beneath your posts. I hope this will help you.
If you are facing any problems regarding this small hack just “nock nock” … comment bellow the post and i will be happy to answer you :)

Read more »


Copyright © 2010 Blogger Tips And Tricks | Affiliate Marketing | Make Money Blogging. All Rights Reserved. Using Xclear Theme | Bloggerized by Themescook Developed by Helios | Powered by Blogger