How to Add Favicon ico in Blogger template

Tuesday, December 22, 2009


What is a Favicon?

A favicon is a small 16X16 image located at the top of your browser in the url bar.
All Blogger templates have a default favicon but we can easily replace it with our own for better branding and personalization.

How to Change your Favicon?

1- Create an image and convert it to a favicon by going to FavIcon Generator or Favicon from pics.
2- Upload your favicon to some image host like PhotoBucket, ImageShack or TinyPic and get the image URL or link.
3- Now log in to Blogger | Dashboard | Layout | Edit HTML and find </head> and place the following code just before </head> tag.
<link rel="shortcut icon" href="YOUR FAVICON URL" />
<link rel="icon" href="YOUR FAVICON URL" />
4- Your code should look something like this:
<link rel="shortcut icon" href="YOUR FAVICON URL" />
<link rel="icon" href="YOUR FAVICON URL" />
</head>
5- Replace YOUR FAVICON URL with the URL of your image and then save your template.

Source: blogger-dashboard.blogspot.com
Read more »

How Blogger Autosaves Your Posts ?

Wednesday, December 2, 2009

HOW TO SAVE YOUR POST IN BLOGGER AUTOMATICLY ?

When you create a new post, Blogger will start automatically saving it for you once a minute, without interrupting your typing. When it does this, you'll see a little note next to the "Save" button, like this:

If you want to make sure the saved copy is completely up to date, you can click the "Save" button yourself. You'll remain on the posting form and can continue typing, since the saving happens in the background. If you're done working on the post for now, you can either click "Publish Post" to convert the draft into a post, or click "Return to list of posts" if you want to leave it as a draft and go back to the Edit Posts page.
This autosave feature means that you have a safety net for the cases when you're working on a new post and the power goes out, or your browser crashes, or some other calamity occurs. All you have to do is log back in to Blogger and find your saved draft on the Edit Posts page. You can even do that from a different computer.
Note: Autosave does not occur when you are editing posts that have previously been published to your blog. This keeps your readers from seeing your edits until you're done with them. When editing a published post, you can click "Publish Post" to republish the changes to your blog, or click "Save as Draft" to unpublish the post and turn it into a draft.


Source: blogger-dashboard.blogspot.com
Read more »

How to Add adsense ads between blog posts or inside Blogger post ?

what is the best things to do to increase your earning from google adsense (CTR)?

Adding adsense ads inside blog posts is a very good idea to increase your CTR.

CTR means"(the number of times your ad clicked) divided by (number of times it is shown).So,the more CTR you have,the more $$ you get.
As we know,there are more chances for the ads to be clicked when they are in the middle(blog posts) rather than at the sidebars(especially the right sidebar),footer,etc.So,

How to place adsense ads between Blogger posts ?

By doing this,the adsense units will be displayed between the blog posts in the homepage,archive pages and permalink(individual post pages).
Follow the procedure to do this:
1.Sign in to your blogger dashboard>click on the layout link
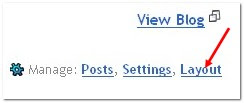
click on the layout link
2.Click on the Edit link in the "Blog Posts' column[look at the below screenshot]
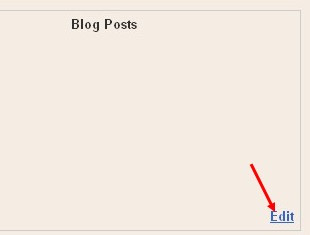
click on Edit ..............a pop up window opens..........
3.Check the box next to 'Show ads between Posts'

next,configure the ads,choose the format,colours,etc and SAVE THE CHANGES.
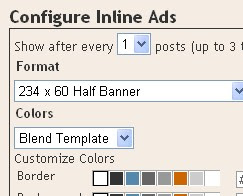
configure the ads
That's it! Now your adsense ads will show between blog posts.
If you want to know how to add the adsense ads inside the blog post rather than between the post, follow this:-
Showing adsense ads inside Blogger blog Posts:-
1.Sign in to your blogger dashboard>layout>Edit html
Check the box next to 'Expand Widget Templates'

2.Scroll down the window till you see this code
<b:if cond='data:post.includeAd'> <data:adEnd/> <data:adCode/> <data:adStart/> </b:if>

3.Replace that code in the template with the below code
<b:if cond='data:blog.pageType != "item"'> <b:if cond='data:post.includeAd'> <data:adEnd/> <data:adCode/> <data:adStart/> </b:if> </b:if>
4.Again,scroll down the template and find out data-post body tag[look at the below screenshot]
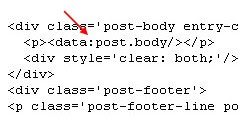
and paste the below code just above that code{this will show ads above the post body}.If you want ads to show below the post,paste the code below that tag.
Here is the code to paste:-
<b:if cond='data:blog.pageType == "item"'> <b:if cond='data:post.includeAd'> <data:adEnd/> <data:adCode/> <data:adStart/> </b:if> </b:if>
well that's all ! you did it :) happy hacks…


Source: blogger-dashboard.blogspot.com
Read more »


Copyright © 2010 Blogger Tips And Tricks | Affiliate Marketing | Make Money Blogging. All Rights Reserved. Using Xclear Theme | Bloggerized by Themescook Developed by Helios | Powered by Blogger