How do I add a poll to my blogger?

Monday, July 26, 2010

Do you ever wonder about your visitors' opinions? Maybe you'd like to find out what your readers think about controversial subjects, or perhaps you just want a vote on whether your should change your blog's font to Verdana. Either way, it's simple to do by adding a poll to your blog.

You'll start by going to the Layout | Page Elements tab for your blog:
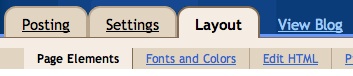

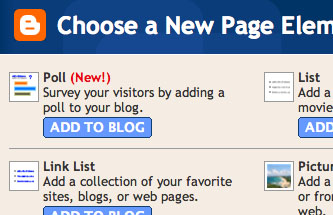
Click the "Add a Page Element" link that appears in the sidebar for your layout. You'll get a popup window with all the different types of page elements you can add to your blog. Look for the one called "Poll" and click on "Add to Blog."

The poll settings let you enter the question you want to ask, and the possible answers you want to allow. You can enter as few or as many possible answers as you like; if you need more than are shown, just click the "add another answer" link.
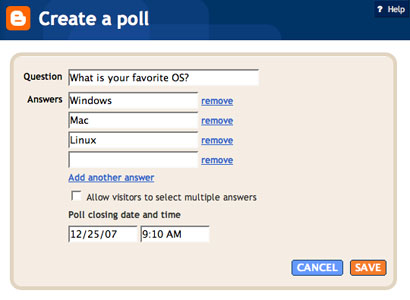
By default, polls are set to run for a week before they stop accepting new votes, but you can change this time frame by entering a new date in the settings. You can also check the option to allow people to vote for multiple answers, if appropriate.

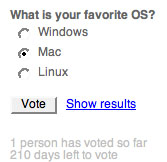
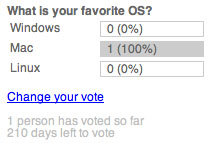
Once you've saved your poll, it will appear on your blog. The "Vote" button will cast a vote for whatever option is selected, and will display the current tally of all votes. You can also click "Show Results" to see what votes have already been cast without making a vote of your own.
Read more »

How do I moderate comments on my BlogSpot ?

Thursday, July 15, 2010

The ability to moderate comments to blogger BlogSpot !

As they are added to your blog can be very handy if you want to catch any comment spam before it reaches your page or if you'd like control over the kind of messages people can leave on your blog. You can find the comment moderation setting on the Settings | Comments tab, along with all of the other comment settings:

Selecting "Always" will automatically enable comment moderation for all incoming comments on your blog. You may also choose to moderate only older comments by specifying a number of days in the "Only on posts older than" setting. Selecting "Never" will disable comment moderation for this blog.
Enabling comment moderation then drops down an email form. This lets you moderate comments via email without affecting your regular comment notification setting. It is optional, since you can always moderate comments through the Blogger interface.

So enable comment moderation from one of the first two options, enter a notification address if desired, save the settings, and wait for your next comment. All incoming comments will now go to a special "Moderate Comments" page, which you can find under the Posting | Moderate comments tab:

On this page, you will see a list of all the comments that have been created but have not yet been approved or rejected. (This list excludes any comments made by admin members of the blog.) By default, they will be sorted by the time they were created, but you can also group them by their respective posts, by clicking the "Post Name" sort option at the top.

Each line in the list displays the beginning of the comment, the author's name, and the time it was created. Clicking the triangle to the left will expand the row to show the full text of the comment, along with "Publish" and "Reject" links, which you can use to approve or disapprove the comment. You can also select multiple comments and publish or reject them all at once, by using the check boxes on the left hand side and the buttons at the top or bottom of the list.

This entire process can also be done via email. If you entered an email address for moderation, you will get a message for each comment which will contain "Publish" and "Reject" links, as well as a link to the main moderation page for the blog. For example:


The links provided will prompt you to log in to your Blogger account, if you aren't already logged in. They will only work for new comments, and will not let you change the state of a comment that has already been moderated.
Notes:
  • Comments that have already been published or rejected are removed from the moderation list. Rejected comments are deleted and cannot be recovered. Approved comments can be deleted in the usual way if you decide you no longer want them.
  • Only blog administrators will be able to moderate comments. Team members without admin privileges will not have access.

Read more »

New Stats Feature on Blogger in Draft

Saturday, July 3, 2010

Is there a statistics feature on Blogger?

How to check traffic on Blogspot?

How to see statistics and analytic of my blog?


Here's a new feature implemented by Blogger, however in Blogger in Draft for the moment. Once it's finalized, it will probably be implemented on Blogger as well.


blogger in draft stats


Once you're on the Stats page, navigate yourself on the navigation to see more detailed information. The stats can be changed depending on your choice - Now, Last Day, Last Week, Last Month or All Time.


stats navigation


Overview Section


On the Overview page, the page views is shown.


page views


Blog posts with the highest page views.


blog posts with page views


Short summary of the traffic sources and audience.


traffic sources and audience


So basically it's like a summary. The stats of the blog can be roughly seen on this page.


Posts Section


On the next page, the Posts page, the more blog posts with the top highest page views will be shown.


top highest page views


From this, blog posts are giving the blog most traffic can be identified.


Traffic Sources Section


On the Traffic Sources page, more details can be obtained. The referring URLs, also known as links, that direct traffic to your blog.


referring links


The referring websites. Shows which website gives the blog the organic traffic.


And the referring keywords as well. Usually these are the keywords people search on Search Engines and got into the blog.


referring keywords


So these information is basically the sites and links that has given traffic to the blog.


Audience Section


On the last page, the Audience page, there's a page views statistics categorized by countries. Visitors' location can be identify by looking at the illustrated map and list.


page views by countries


Also, page view categorized by web browsers. The top used browsers used to access the blog can be known too.


page views by browsers


And lastly, page views by operating systems. Pretty self-explanatory.


page views by operating system


All in all, a little information about the visitors can be seen here.


Besides this default stats feature, other external Traffic Tracker and Statistics on your Blogger blog as well.
Read more »

How To Remove Blogger Navigation Bar in Template Designer (Update)

Friday, July 2, 2010

How to delete navigation bar on Blogger Draft template?

How to remove default bar on Draft Template Designer?


blogger draft navigation bar


It can also be done via this method. Navigate yourself through:


Dashboard > Design > Template Designer > Advanced > Add CSS


And then add this:


#navbar-iframe {display: none !important;}


Click "Apply to Blog" and you're done.


Credit: Comment by Bytexpert


P/S: Click here for the previous workable method.
Read more »

How does Blogger Mobile work?

Monday, June 28, 2010


You send a message - which can be a photo, some text, or both - to go@blogger.com. We take care of the rest. In other words, we auto-provision a new blog and publish the post. It's that simple.
Here's how to start a mobile blog:
  1. Text REGISTER to BLOGGR to create your mobile blog. The text and/or photo in your message will be uploaded to that blog right away. We'll message you back with the address, (so you can visit your new blog on the web) and a token (so you can claim your blog and access it from your account).
  2. OPTIONAL - If you feel like changing anything on your new mobile blog or if you already have a Blogger account and want the posts to go to your existing blog, you can log in to go.blogger.com and enter the token we sent to your phone. You'll then have the option to claim your new mobile blog and merge it with your existing blog. Note to users whose blog address does not contain blogspot.com: Once you make the aforementioned switch, new mobile posts will be published to your chosen blog but mobile posts published prior to the switch will not be moved over automatically.
What types of messages can I send to Blogger Mobile from my phone?
MMS, SMS, or Email - note this doesn't include email sent from a mobile device that actually passes through a webmail gateway (such as mail sent from your stanford.edu account from your phone).
What size photos can I send?
Photos are currently limited to 250K each. If they exceed that size, you'll receive a bounce message letting you know so you can try again with a smaller picture. Note that your phone (or carrier) might have size limits of its own.
Is there a cost for using Blogger Mobile?
Mobile providers' standard rates for sending and receiving text and photo messages apply. Blogger won't charge you for any of its services.
Requirements

Text messaging-enabled mobile device with a text messaging plan. This service is free from Google but charges from your carrier for usage may apply.

Notes:


  • To cancel text message replies, text STOP to BLOGGR


  • To unlink your device from Blogger, text UNREGISTER to BLOGGER. You are free to then register with another blog if you wish.


  • For more information, send the keyword HELP to BLOGGR (256447)


  • Getting Started


    Source: blogger-dashboard.blogspot.com
    Read more »

    How do I use the Blogger Reading List?

    Saturday, June 26, 2010

    (Note: blogger is slowly adding this feature for all users, some of the functionality may not be available to all users immediately.) With the Blogger Reading List, you can read all of the latest posts from your favorite blogs right on your Blogger Dashboard! Your Blogger Reading List, conveniently located under your list of blogs on your dashboard, enables you to subscribe to any blog with a feed. It will update instantly each time a new post is published on any blog in your Reading List. Additionally, you can check out our latest Blogger Buzz posts from the "Blogger Buzz" tab, and the latest Blogs of Note from the "Blogs of Note" tab.
    It is simple to add a blog to your Reading List. First, click on the "Blogs I'm Following" tab under "My Reading List" on your Blogger Dashboard.


    Then, click on the blue "Add" button in the bottom left corner of your Reading List.


    Next, insert the URL of the blog you'd like to follow in the URL box. You can add as many blogs as you'd like by clicking on "Add another". When you have added all of your favorite blogs, click the orange "Add" button.


    You'll then be given the option to either follow publicly or privately:


    Once you've decided on following publicly or privately, click the orange "Follow" button and that's it! You've added all your favorite blogs to your Reading List! Now, every time one of the blogs are updated the latest post will be displayed in your reading list under the "Items" section.


    Additionally, adding a blog to your Reading List will create a subscription to the blog in your Google Reader account.

    How to remove a blog from your Reading List

    To remove a blog from your Reading List, go to the "Blogs I'm Following" tab under your Reading List on your dashboard.


    Then, click the blue "Manage" button. You will be taken to a page with a list of all the blogs that you are following. To stop following one of the blogs, click the trash can icon next to the blog you want to stop following. You will instantly be removed from following the blog and it will be removed from your Reading List.


    You also have the option to change how you'd like to follow the blog (publicly or privately) from the drop-down menu.


    Source: blogger-dashboard.blogspot.com
    Read more »


    Copyright © 2010 Blogger Tips And Tricks | Affiliate Marketing | Make Money Blogging. All Rights Reserved. Using Xclear Theme | Bloggerized by Themescook Developed by Helios | Powered by Blogger