How to Add Favicon ico in Blogger template

Tuesday, December 22, 2009


What is a Favicon?

A favicon is a small 16X16 image located at the top of your browser in the url bar.
All Blogger templates have a default favicon but we can easily replace it with our own for better branding and personalization.

How to Change your Favicon?

1- Create an image and convert it to a favicon by going to FavIcon Generator or Favicon from pics.
2- Upload your favicon to some image host like PhotoBucket, ImageShack or TinyPic and get the image URL or link.
3- Now log in to Blogger | Dashboard | Layout | Edit HTML and find </head> and place the following code just before </head> tag.
<link rel="shortcut icon" href="YOUR FAVICON URL" />
<link rel="icon" href="YOUR FAVICON URL" />
4- Your code should look something like this:
<link rel="shortcut icon" href="YOUR FAVICON URL" />
<link rel="icon" href="YOUR FAVICON URL" />
</head>
5- Replace YOUR FAVICON URL with the URL of your image and then save your template.

Source: blogger-dashboard.blogspot.com
Read more »

How Blogger Autosaves Your Posts ?

Wednesday, December 2, 2009

HOW TO SAVE YOUR POST IN BLOGGER AUTOMATICLY ?

When you create a new post, Blogger will start automatically saving it for you once a minute, without interrupting your typing. When it does this, you'll see a little note next to the "Save" button, like this:

If you want to make sure the saved copy is completely up to date, you can click the "Save" button yourself. You'll remain on the posting form and can continue typing, since the saving happens in the background. If you're done working on the post for now, you can either click "Publish Post" to convert the draft into a post, or click "Return to list of posts" if you want to leave it as a draft and go back to the Edit Posts page.
This autosave feature means that you have a safety net for the cases when you're working on a new post and the power goes out, or your browser crashes, or some other calamity occurs. All you have to do is log back in to Blogger and find your saved draft on the Edit Posts page. You can even do that from a different computer.
Note: Autosave does not occur when you are editing posts that have previously been published to your blog. This keeps your readers from seeing your edits until you're done with them. When editing a published post, you can click "Publish Post" to republish the changes to your blog, or click "Save as Draft" to unpublish the post and turn it into a draft.


Source: blogger-dashboard.blogspot.com
Read more »

How to Add adsense ads between blog posts or inside Blogger post ?

what is the best things to do to increase your earning from google adsense (CTR)?

Adding adsense ads inside blog posts is a very good idea to increase your CTR.

CTR means"(the number of times your ad clicked) divided by (number of times it is shown).So,the more CTR you have,the more $$ you get.
As we know,there are more chances for the ads to be clicked when they are in the middle(blog posts) rather than at the sidebars(especially the right sidebar),footer,etc.So,

How to place adsense ads between Blogger posts ?

By doing this,the adsense units will be displayed between the blog posts in the homepage,archive pages and permalink(individual post pages).
Follow the procedure to do this:
1.Sign in to your blogger dashboard>click on the layout link
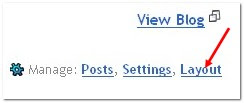
click on the layout link
2.Click on the Edit link in the "Blog Posts' column[look at the below screenshot]
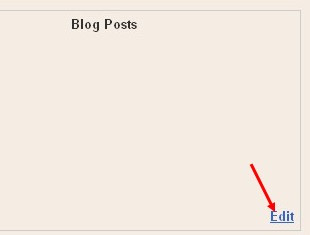
click on Edit ..............a pop up window opens..........
3.Check the box next to 'Show ads between Posts'

next,configure the ads,choose the format,colours,etc and SAVE THE CHANGES.
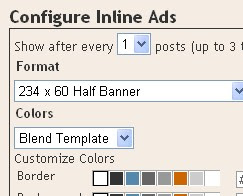
configure the ads
That's it! Now your adsense ads will show between blog posts.
If you want to know how to add the adsense ads inside the blog post rather than between the post, follow this:-
Showing adsense ads inside Blogger blog Posts:-
1.Sign in to your blogger dashboard>layout>Edit html
Check the box next to 'Expand Widget Templates'

2.Scroll down the window till you see this code
<b:if cond='data:post.includeAd'> <data:adEnd/> <data:adCode/> <data:adStart/> </b:if>

3.Replace that code in the template with the below code
<b:if cond='data:blog.pageType != "item"'> <b:if cond='data:post.includeAd'> <data:adEnd/> <data:adCode/> <data:adStart/> </b:if> </b:if>
4.Again,scroll down the template and find out data-post body tag[look at the below screenshot]
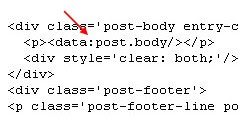
and paste the below code just above that code{this will show ads above the post body}.If you want ads to show below the post,paste the code below that tag.
Here is the code to paste:-
<b:if cond='data:blog.pageType == "item"'> <b:if cond='data:post.includeAd'> <data:adEnd/> <data:adCode/> <data:adStart/> </b:if> </b:if>
well that's all ! you did it :) happy hacks…


Source: blogger-dashboard.blogspot.com
Read more »

Traffic Tracker and Statistics for Blogs

Wednesday, November 25, 2009

Traffic and statistics for blogs.

What are the best traffic checker for sites?

What blog statistics tracker suits blogs?


Here are some well-known traffic trackers that you can use for your blog, just to see how your blog's traffic is doing.


1) Google Analytics


google analytics logo


"Google Analytics is the enterprise-class web analytics solution that gives you rich insights into your website traffic and marketing effectiveness. Powerful, flexible and easy-to-use features now let you see and analyze your traffic data in an entirely new way. With Google Analytics, you're more prepared to write better-targeted ads, strengthen your marketing initiatives and create higher converting websites."


Editor's note: This is a must for all blogs.


2) SiteMeter


sitemeter logo


"Site Meter's comprehensive real time website tracking and counter tools give you instant access to vital information and data about your sites audience. With our detailed reporting you'll have a clear picture of who is visiting your site, how they found you, where they came from, what interests them and much more."


Editor's note: This is my favourite among the other traffic trackers (excluding Google Analytics)


3) OneStat (free version)


onestatfree logo


"OneStat Free is the most reliable, fully password-protected tracker available today. We provide you the most detailed web analytics reports and the best of all: it is absolutely free!"


4) StatCounter


statcounter logo


"A free yet reliable invisible web tracker, highly configurable hit counter and real-time detailed web stats. Insert a simple piece of our code on your web page or blog and you will be able to analyse and monitor all the visitors to your website in real-time!"
Read more »

How To Add Table To Blog Post

Saturday, September 26, 2009

How to include table in blog post?
How to add boxes for text in blog post?

AB
CD

Here's the example of the code used to create a table with 2 rows and 2 columns.

<table align="center" border="1" cellpadding="5" cellspacing="1" width="400"><tbody><tr><td>A</td><td>B</td></tr><tr><td>C</td><td>D</td></tr></tbody></table>

As you can see, <tr> is the tag to begin a row, and the tag ends with </tr>.

While in between <tr> and </tr>, we have <td> to indicate a particular column in the row, and it ends with </td>. In between that, you can type the text you want. The example given is "A".

You can have as many <td> your text </td> you want in between the <tr> and </tr> tag.

Once you are done with a particular row, you can start another row my using <tr> again. And the process continues.

You can also modify the values of table align, border, cell padding and cell spacing. Changing the values will show different table styles. Try it out.

For the width, you can either use the pixel value (example "400") or the percentage (example "90%") to suite your preference.

Here's an example of another table with these values:

table align="center" border="10" cellpadding="10" cellspacing="10" width="90%"

And you might also want the values to be in the center. So just add <center>A</center> to the text.

A
B
C
D

Feel free to try it. Enjoy!
Read more »

How To Set Password for Blogger Post

Sunday, September 13, 2009

How to make blogger post private?
How to encrypt blogger post?
How to create blog post with password?

It's basically called text encryption and decryption. JavaScript is used to perform this function.

To learn how, please proceed to http://www.vincentcheung.ca/jsencryption/instructions.html.

Enjoy! =)

***UPDATE 11/8/2010***: A thorough tutorial on setting password for blog posts can be found at our LATEST TUTORIAL GUIDE. Check it out.
Read more »


Copyright © 2010 Blogger Tips And Tricks | Affiliate Marketing | Make Money Blogging. All Rights Reserved. Using Xclear Theme | Bloggerized by Themescook Developed by Helios | Powered by Blogger