How does Blogger Mobile work?

Monday, June 28, 2010


You send a message - which can be a photo, some text, or both - to go@blogger.com. We take care of the rest. In other words, we auto-provision a new blog and publish the post. It's that simple.
Here's how to start a mobile blog:
  1. Text REGISTER to BLOGGR to create your mobile blog. The text and/or photo in your message will be uploaded to that blog right away. We'll message you back with the address, (so you can visit your new blog on the web) and a token (so you can claim your blog and access it from your account).
  2. OPTIONAL - If you feel like changing anything on your new mobile blog or if you already have a Blogger account and want the posts to go to your existing blog, you can log in to go.blogger.com and enter the token we sent to your phone. You'll then have the option to claim your new mobile blog and merge it with your existing blog. Note to users whose blog address does not contain blogspot.com: Once you make the aforementioned switch, new mobile posts will be published to your chosen blog but mobile posts published prior to the switch will not be moved over automatically.
What types of messages can I send to Blogger Mobile from my phone?
MMS, SMS, or Email - note this doesn't include email sent from a mobile device that actually passes through a webmail gateway (such as mail sent from your stanford.edu account from your phone).
What size photos can I send?
Photos are currently limited to 250K each. If they exceed that size, you'll receive a bounce message letting you know so you can try again with a smaller picture. Note that your phone (or carrier) might have size limits of its own.
Is there a cost for using Blogger Mobile?
Mobile providers' standard rates for sending and receiving text and photo messages apply. Blogger won't charge you for any of its services.
Requirements

Text messaging-enabled mobile device with a text messaging plan. This service is free from Google but charges from your carrier for usage may apply.

Notes:


  • To cancel text message replies, text STOP to BLOGGR


  • To unlink your device from Blogger, text UNREGISTER to BLOGGER. You are free to then register with another blog if you wish.


  • For more information, send the keyword HELP to BLOGGR (256447)


  • Getting Started


    Source: blogger-dashboard.blogspot.com
    Read more »

    How do I use the Blogger Reading List?

    Saturday, June 26, 2010

    (Note: blogger is slowly adding this feature for all users, some of the functionality may not be available to all users immediately.) With the Blogger Reading List, you can read all of the latest posts from your favorite blogs right on your Blogger Dashboard! Your Blogger Reading List, conveniently located under your list of blogs on your dashboard, enables you to subscribe to any blog with a feed. It will update instantly each time a new post is published on any blog in your Reading List. Additionally, you can check out our latest Blogger Buzz posts from the "Blogger Buzz" tab, and the latest Blogs of Note from the "Blogs of Note" tab.
    It is simple to add a blog to your Reading List. First, click on the "Blogs I'm Following" tab under "My Reading List" on your Blogger Dashboard.


    Then, click on the blue "Add" button in the bottom left corner of your Reading List.


    Next, insert the URL of the blog you'd like to follow in the URL box. You can add as many blogs as you'd like by clicking on "Add another". When you have added all of your favorite blogs, click the orange "Add" button.


    You'll then be given the option to either follow publicly or privately:


    Once you've decided on following publicly or privately, click the orange "Follow" button and that's it! You've added all your favorite blogs to your Reading List! Now, every time one of the blogs are updated the latest post will be displayed in your reading list under the "Items" section.


    Additionally, adding a blog to your Reading List will create a subscription to the blog in your Google Reader account.

    How to remove a blog from your Reading List

    To remove a blog from your Reading List, go to the "Blogs I'm Following" tab under your Reading List on your dashboard.


    Then, click the blue "Manage" button. You will be taken to a page with a list of all the blogs that you are following. To stop following one of the blogs, click the trash can icon next to the blog you want to stop following. You will instantly be removed from following the blog and it will be removed from your Reading List.


    You also have the option to change how you'd like to follow the blog (publicly or privately) from the drop-down menu.


    Source: blogger-dashboard.blogspot.com
    Read more »

    ELEGANT DASHBOARD is My third Blogger Template !

    Friday, June 25, 2010


    Here is the DEMO
    NO Download link yet because i am still not sure if need more optimization ! please try the demo link and let me know what do you think by comment !
    Guys if you try it and you see it ok and no error with all the browsers ! than comment please bellow to release it FOR YOU TO DOWNLOAD IT ASAP :)

    Update for Elegant Dashboard blogger template !

    after some review and some test i have made with my visitors ,I have decided to announce the download link for Elegant Dashboard my third premium blogger template !
    but please i would like to hear from you if any error came out from the template ! so i could fix it to improve my design by your help ! thanks guys and here is the Download link bellow “ DOWNLOAD


    Source: blogger-dashboard.blogspot.com
    Read more »

    How To Buy Custom Domain for Blogger

    Saturday, June 19, 2010

    How to buy domain for Blogspot blog?

    How to add custom domain on Blogger blog?

    Where to purchase custom domain for Blogger?


    Firstly, head to:


    Dashboard > Settings > Publishing


    Then click on Switch to "Custom Domain".


    custom domain


    So now you're on the page where you buy a domain for your blog via Google Apps. A domain costs USD10 a year.


    Enter the domain address you desire and check on its availability by clicking on the blue button beside.


    enter custom domain


    Take note: Your readers won't be left behind!


    notice


    So there's no need for your readers to change your link on their blog roll because it will be automatically redirected to your new domain.


    After checking its availability, you will redirected to a new page with information regarding the domain.


    domain information


    If you noticed below, there's a phrase "Powered by GoDaddy.com" or "Powered by eNom". These 2 are the domain registration partners of Google. Click on "Learn more" to switch between them. I would suggest GoDaddy.com.


    godaddy and enom


    Then, continue with the registration.


    Enter your domain name information and remember to check "Automatically renew my registration every year" if you want to keep this domain.


    renew domain


    Follow the rest of the instructions and it's pretty simple. Do remember to have your credit card/debit card ready as well.


    All the best!
    Read more »

    Layout Guide for blogger

    Saturday, June 12, 2010

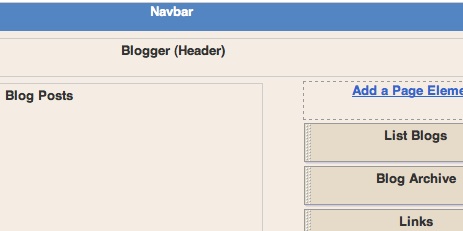
    Blogger's Layout feature is an easy-to-use template editing feature that allows you to edit and customize your Blogger template without any knowledge of HTML or CSS. You can easily edit and customize the colors, fonts, header and sidebar of your blog with a few clicks of the mouse. To customize your blog's layout, go to the Layout | Page Elements tab in Blogger.
    Layouts Tab
    If you're using a classic template and would like to use the Layout feature, you can read instructions on how to switch.

    Moving elements in your template

    How to arrange elements in your template

    You can arrange the elements in your template the way you want them displayed. Simply click on the element you'd like to move and drag and drop it where you want it to be. You can move your page elements to the bottom of the page, anywhere in your sidebar, or below or above your blog posts. (Note: you can move all elements except your navbar, blog posts and header in some templates.)
    Layouts

    Editing elements in your template

    Here's an overview of what you can configure when you click Edit for each of these elements:
    • Navbar: Select the color you'd like your Navbar to be.
    • Header: Add or edit the header of your blog, which includes your blog title and blog description.
    • Blog posts: Choose the number of posts to display on your main page. You can choose either the number of days with posts to display or the total number of posts on the main page. You also have the option to show email post links that let your visitors easily email posts from your blog to their friends.
    • Profile: Edit/add your profile title, 'About Me' description, and location.
    • Blog archive: Edit/add your blog archive title, select your display style (hierarchy, flat list or dropdown menu), choose to display post titles, display oldest posts first, choose your archive frequency (monthly, weekly or daily) and date format.

    How to add a page element

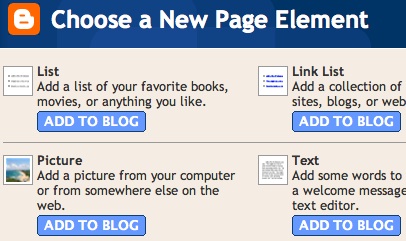
    You can add several page elements to your blog page or sidebar by clicking Add a Page Element. This will open a pop-up window. Click Add to Blog in the proper element section to add it:
    New Page Element
    • List: Add a list with the ability to add a title, select the number of items to display, sort your list alphabetically and add links to your list elements.
    • Link List: Add a link list to your blog with the ability to add a link list title, select the number of items to display and sort your link list alphabetically.
    • Labels: Add a list of all the labels you've used on your posts. Click each link to see a page showing all the posts with that label. You can change the title of the list, and sort it alphabetically or by frequency of use.
    • Picture: Add a picture from your computer or the web. You can also add a title and caption to your picture and shrink the picture to fit into your blog perfectly.
    • Text: Add text to your blog (such as a welcome message or footnote) with our rich text editor.
    • HTML/JavaScript: Add third-party functionality or other HTML/JavaScript code to your blog.
    • Feed: Add content from a site feed. Enter the feed URL, then click Continue. You'll then be able to add a title, select the number of items to show (up to five) and display the item dates and/or authors by selecting the appropriate check boxes.
    • Logo: Add one of our stylish Blogger logos to your blog.
    Read more »


    Copyright © 2010 Blogger Tips And Tricks | Affiliate Marketing | Make Money Blogging. All Rights Reserved. Using Xclear Theme | Bloggerized by Themescook Developed by Helios | Powered by Blogger